| How to Build Your First Surfboard by Stephen Pirsch |
|
HOME
This is your site. It is not biased by any direct advertising and no money is accepted for any links shown. It is made for you and supported by you. PLEASE DONATE!
HALL OF FAME Mark Sadler |
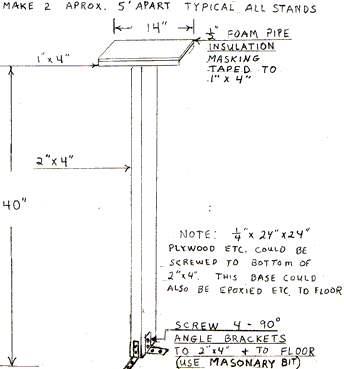
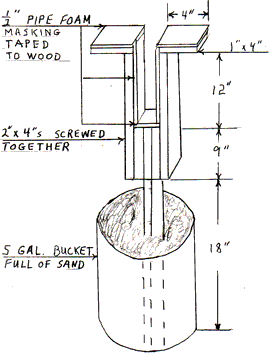
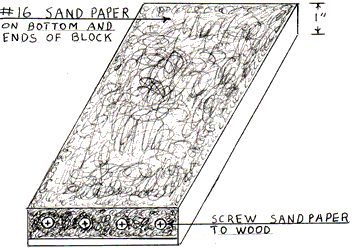
STANDS AND BLOCKS Before shaping, surfboard stands are needed (see figures 5,6,7,8,). If something similar to the figures is not made, regret is the likely result. I recommend the stands in Figure 6 (the buckets can be moved and re-leveled anywhere and the blank can be placed rail up). The stands in Figure 8 are easier to make, and still allow for rail up work. It will help greatly to be able to move the blank outside. Keep the pipe foam shown in the figures wrapped with masking tape (black pipe foam will stain white blank foam and glass job). Note that 1/2" pipe foam refers to the foam thickness, not the diameter of the pipe it is made for. Buy foam that is made for at least 1" pipe. Level the racks periodically by putting the torpedo level across the tops. Figure 6 can be made stiffer by wedging scrap surfboard foam, wood or, bricks between the stand wood and the side of the bucket. Note: If you think that building racks is too much trouble, and you have not bought any materials, you should stop the surfboard project now. Most of the time and money spent now will not have to be repeated on following boards. Most of the stand and block materials can be found in construction site trash piles. Even if a power sander or power planer is available, the following blocks or something very similar will be needed. See www.harborfreight.com for inexpensive tools. Even though it is possible to make a good surfboard with no power tools, I recommend you at least have a drill, preferably with 2 handles (screw on side handle), with variable speed between 2000 and 3000 rpm. Make 1-10"x4.5"x1" wood block and screw #16 floor sanding paper to it as shown in Figure 9. #12,or #16,or #20 is available at many floor sanding machine rental companies. Many of the processes that follow assume you have #16 grit). If you have to choose between #12 and #20 get the #12. It will make it much easier to get the crust off the blank. Another alternative is to order 1-9" #16 sanding disk from www.fiberglasssupply.com and screw it to an 8" block in place of the 10" above. Also make 1-10"x3.5"x1" wood block and cover as in Figure 9 with #50 Belt sanding paper etc. Finally make 1-26"x3.5"x1" wood block and cover as in Figure 9 with #50 belt sanding paper etc It is especially important that this block be very straight and flat (not warped). These sizes don't have to be exact but try to use the listed grits (#16,#50). Figure 5
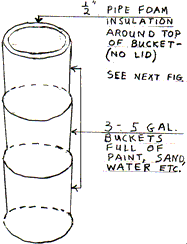
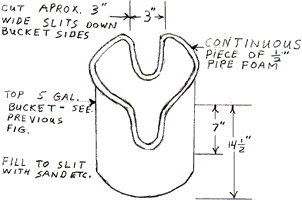
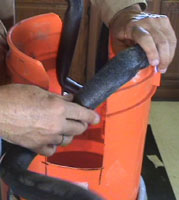
Figure 6 Note: 3&7/8" gap above is foam to foam. Wood to wood is 4&7/8". A 2x4 is actually 1&5/8" thick. Stands are 5 - 2x4's wide at widest point. The gap can be adjusted for thin blanks by using another layer of foam, or using 2 - 1" x 4" spacers in place of the 2 - 2" x 4". Do not try to screw through two or three 2x4's - screw them one at a time, or drill them first. Figure 7 Figure 7 Note: This stand works better if you leave the lid off the top bucket and wrap pipe foam completely around the top edge. Cut 3" wide (adjust for your board thickness) and 7" long slits longwise from top edge to center of bucket (round the corners, and the bottom). These slits and the top of the bucket can be covered with one continuous piece of pipe foam taped in place. Tape two extra layers of pipe foam over the bottom of each bucket cut to prevent denting the blank edge. Put sand etc. in the bottom of the bucket. This will allow the board to be placed rail up for sanding etc. If the floor or ground that the buckets are sitting on is not level, level the buckets by simply wedging something underneath the buckets (cardboard etc.). See Figure 8. Figure 8
|