| How to Build Your First Surfboard by Stephen Pirsch |
|
HOME
This is your site. It is not biased by any direct advertising and no money is accepted for any links shown. It is made for you and supported by you. PLEASE DONATE!
HALL OF FAME Mark Sadler |
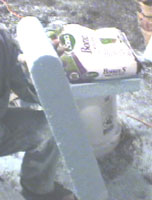
POLYSTYRENE I advise letting economics help you make your decisions as to which
materials to use. A good surfboard can be made with any of the materials
mentioned in this book. Allow me to simplify your decision by suggesting
the following: You might save money by using polystyrene block and you might make
a lighter board, but you will require probably four
times more labor to shape polystyrene blocks, compared to a polyurethane
surfboard blank. Consider partially pre-shaped polystyrene blanks,
which are now widely available. Polystyrene surfboard blanks come
in the following two versions: 1. A rectangular shape,(no outline
or rails) with a stringer glued in, and the rocker planed in. 2.
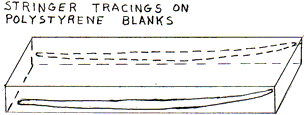
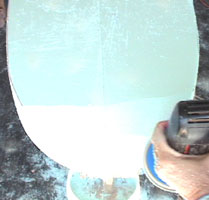
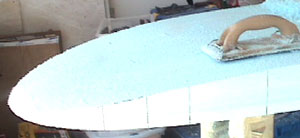
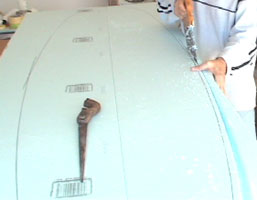
The outline, rails and rocker molded in, and a stringer glued in. When using polystyrene foam epoxy resin must be used to saturate the fiberglass cloth (laminate layer) (most surfboards have 3 resin layers; the laminate coat, hot coat, and gloss coat). Epoxy resin is necessary because polyester resin has styrene in it and will dissolve the styrene in polystyrene foam. Epoxy resin is roughly twice as fracture resistant as polyester resin (not twice as strong) and a little more than twice as expensive. Consider that besides the extra labor, much of the money you saved on polystyrene foam will be lost on the extra cost of the epoxy (See EPOXY). Finally, keep in mind that if you chose expanded polystyrene (EPS) (beaded foam) and it gets fractured, it will absorb more water than polyurethane foam or extruded polystyrene foam. It is very important to dry it out and fix it immediately when damaged. I recommend installing a screw out plug/vent like some sailboard companies do, so any water can be easily dried and drained. You usually will not be able to determine the grade but, if you can, get the highest, least absorbent grade of expanded polystyrene foam (beads more tightly fused). Most EPS blanks are 2lb/cu.ft. Blanks are available in 2.5 and 3lb. also - water absorbtion is unlikely to be a problem with these denser blanks. EPS is an especially good foam if you are willing to stop surfing when it gets damaged. My experience is, for most surfers, water absorption is not a big enough problem to cause them to decide against using it again (especially with recent improvements in all EPS due to a huge lawsuit). Polyurethane and extruded polystyrene (see bottom of this page) are much less water absorbent in a fractured shell. For all of these reasons, I believe a polystyrene blank or block is mostly worth considering for savings due to possible high shipping costs of polyurethane blanks. Polystyrene foam is more widely available than polyurethane foam. A polyurethane surfboard blank is usually easier to shape (because it is already mostly shaped) and will generally give you less problems later on, but high shipping costs should make you consider polystyrene. On the good side, polystyrene/epoxy boards tend to be more damage resistant, lighter, and less expensive than polyurethane/polyester boards. Most people are happy with their expanded or extruded polystyrene/epoxy boards. One other benefit of block foam is the freedom to make an unusual shape that would be impossible with a polyurethane surfboard blank (such as a very wide, thick and, short board). By using block foam, it is possible to reduce the total surfboard material cost by about 25%. So, if you are determined to go with polystyrene, here is what I suggest you do... You can buy expanded polystyrene blanks which are partially shaped with stringers from: www.surfsource.net, www.foamez.com, fiberglasssupply.com and... Segway composites and Hydrofoam in California, Craig Chafin and S - Foam in Texas, Coda Core and Davo in Florida, Natural Art in Cape Hatteras, North Carolina, Fly in New Jersey, Shuller systems in Seaside Oregon (I have only dealt with the first three companies, and do not have any more information on the others). You can also buy block foam from a local supplier (if possible). Most large cities will have listings in the yellow pages under foam,or insulation. Also, you can do a search on the internet. Type www.dogpile.com in the address bar. Type polystyrene foam and the name of a large city near you in the search box. Also try www.thomasnet.com. Please do not email me asking me to find polystyrene foam for you). If you wanted an 8' board you might order one of the following; 1 - 8'1" x 24" x 6" block of 2lb./cubic foot expanded polystyrene, or (if you are using a stringer, or glue joint) 2 - 8'1" x 12" x 6" blocks. If you are using block foam I would like to encourage you to make a stringerless board, or a board with an epoxy glue joint. This will save labor, and will probably save weight and money. If you intend to do without a stringer I recommend the following layers of cloth: 4 oz. "E" cloth - 2 top, 2 bottom, and 2 deck patches. If doing without a stringer, are over 160 lbs., or intend to ride hollow waves, or intend to make a thin board, I highly recommend all 4oz. "S" cloth layered as above. Another alternative is 4.8 oz. carbon fiber cloth - 1 top, 1 bottom, and 1 deck patch (suitable carbon cloth not available in 2008 - please email me if you find an economical source). Do not use foam from Lowe's, or Home Depot for your first board. These foam sheets are 1lb/cu.ft. Use at least 2lb/cu.ft. foam on your first board. Many builders have written me claiming poor results with 1lb foam. A good board can be made with this foam, but you will spend more on the extra shell material than you save on the foam - plus other negatives such as denting, and delaminating. If you must use a stringer in your block foam, consider going to Lowe's etc. and buying the cheapest 4'x8'x1/8" paneling. This should be about $14. If your board will be over 8'5" (an 8'5" stringer can be cut diagonally from 8' paneling) it will be hard to find an inexpensive stringer. Consider an epoxy glue joint,or epoxy with fiberglass cloth in place of the stringer (it will be lighter yet similar in strength to a 1/12" stringer with hot glue etc. If you insist on a stringer, do steps 1 - 5. If not using a stringer see step 6.
Alternative method:
When you finish take interior/exterior lightweight spackling and your squeegee (cheap plastic squeegee works well) and spread it thinly over every inch of foam. Scrape off the excess with your squeegee being careful not to scratch your blank. Sand it lightly with approximately #120. Make sure it's completely covered (not scratched through) or it may absorb a lot of expensive epoxy and become heavy. See EPOXY. Spackling may not be needed if you have the highest grade of polystyrene. This grade is less absorbent. Use the spackling unless you are sure. Although I mention spackling seal numerous times, do not use it for large repairs, and never on extruded polystyrene. Note that the spackling does not completely seal the blank - epoxy migrates through to the foam at a reduced rate. Consider the sealer below. Alternative sealer: For a stronger laminate with slightly more weight try the following. Mix epoxy and hardener with microsphere thickening agent to a mayonnaise thickness. Spread and sand as paragraph above. One more alternative is to use 2lb./cubic foot (25psi - pounds
per square inch) extruded polystyrene foam (XPS) - Dow Square Edge,
or "blue board". Please try to keep and open mind,
and disregard much of the information you might have read online
etc., about this foam. The delamination problems which have caused
some builders to stop using this foam can be solved by following
the directions below. A very good board can be made with this foam
if you will simply build the board a little differently. This foam
does not have the water absorption problem that expanded polystyrene
has. Extruded polystyrene is stronger (pound for pound)
than polyurethane, or expanded polystyrene (most surfboard polyurethane
is about 3lb/cu.ft.). If you build with this foam using
conventional methods, you are much more likely to have delamination
problems.
The extra resin will fill in all the pits and scratches left on the rough blank. I realize it is hard to scratch and tear the foam of a blank you worked so hard to perfect, but do not skip this step. The pits and scratches greatly increase the bond, and with the glue joint/s, will minimize the delamination problem to a level equal to other foams. As with all boards, but especially XPS, avoid exposing an XPS board to a car interior on a hot day with the windows rolled up. This foam is available in sheets 8' x 4' x 3" and 8' x 2' x 4" thickness maximum, so you may have to glue (epoxy) two sheets together. It is possible to make two good boards out of one 8' x 4' x 3" sheet, if you bend the foam as in the paragraph below. XPS was available in 2006 for $46 for a 8'x4'x3" sheet. Bending foam using one of the following methods will save money
and labor - by allowing you to use a thinner blank which will
require less foam to remove. This method can be used with
any stringerless foam (you will be able to bend an epoxy glue joint,
but only about 2"). Align the rocker template nose tip
with the blank nose tip and mark as much of the nose rocker curvature
that the blank thickness will allow. Mark about half the tail rocker
(the tail will bend about an inch when you bend the nose).
Shape the rocker (as much as possible), cut the outline, and completely
finish shaping the blank as mentioned previously.
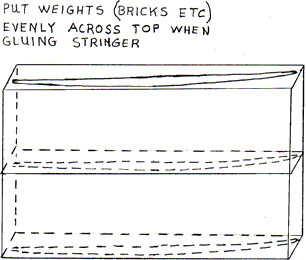
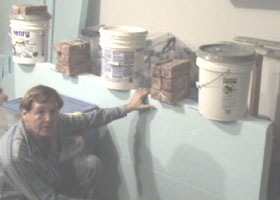
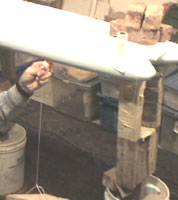
When the lamination hardens it will permanently hold the bend (it will spring back about 1/4" -1/2"). You can change the amount of curve in different areas of the blank by moving the racks, changing the position of the weights, and the amount of the weights. This can all be checked (before cloth saturation) by putting weights on top of the blank. Try not to bend the foam more than 3". Note: leave plastic anchors in the blank.
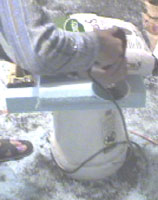
You can bend the foam to match a pre-rockered stringer, then clamp, or weight it together. This is what Clark Foam did. I no longer use stringers (too expensive, too heavy, and too much work). It is more effective to use heavier cloth instead of stringers - the board will be more damage resistant. To make a board that is almost impossible to dent or delaminate, consider the following: Puncture or drill the blank every 2" (bottom to top) with 1/8" drill bit or 1/8" steel rods. Make a puncture tool by first drilling 1/8” holes in a 6”x 6”x 5/8” piece of wood. Insert 1/8”x 3 - 4” steel rods (9 rods) into holes in wood, and epoxy in place. The holes in the foam will fill with resin when laminating, bridging the top and bottom together (do this only with uscomposites Klear Kote Epoxy, as it is much thicker than most other resins).. On the first lamination, wipe the resin, which will drip out the opposite side of the holes, when it gels. Also; 3/16" holes can be filled with 3/16" bamboo barbeque skewers, available at most grocery stores - this method will work with any resin (see TIPS chapter, DELAMINATIONS section). This has been tested since 2005. Please do not do this in order to reduce cloth amounts. If you glue sheets together try to figure out where the glue joint crosses the outline and rocker of your board and avoid putting glue there (otherwise it will be much harder to shape at the glue joint). Yes, a good surfboard can be made with extruded polystyrene foam. www.pointblanks.com is making virtually unbreakable surfboards using extruded polystyrene. They do not sell foam. On extruded foam, do not use lightweight spackling, or any art work. It tends to delaminate at these areas. Repairs can be done by one of the two following methods:
This is my favorite foam but it is a lot of trouble. Build with it only if you are willing to use the unconventional methods mentioned four paragraphs above. We find XPS is especially good for situations where the board is fractured, due to rocks etc., and the rider refuses to fix it immediately, or ever (for practical purposes, it is impervious to water). I like extruded polystyrene but, it may not be worth the extra effort. Expanded polystyrene is easier to find, can be bought in nearly any thickness and length (blocks), is better suited to a stringerless blank, and is sold in partially pre-shaped blanks. Remember, you can buy polystyrene block (EPS or XPS) in one solid sheet, at the minimum thickness of your board, bend it after shaping, and save about 75% of the cost, of a pre-shaped blank (this is the cheapest and hardest way to make your own blank). Another alternative is to strip the fiberglass from an old board. This can be done by running a 3" abrasive disk around the circumference of the mid rail, cutting barely through the fiberglass into the foam. Carefully pry the fiberglass off the rails (you may have to make extra cuts where the curves are small - perpendicular to the mid rail cut). Once the rails are striped the fiberglass will pull off the remainder of the board very easily. Re-shape the blank Some people are using 2 lb./cu. ft. polyurethane block foam to build surfboards. My friends and I have tried it numerous times. We are sure you will like 2lb/cu.ft. polystyrene block foam better. It is stronger and less expensive. 2lb extruded polystyrene is 25psi. This foam is also available in 40, 60, 80, and 100psi. Although the tendency to use lighter foams and thicker laminates is now more prevalent, I believe there is good reason to experiment with the higher psi foam. The 60psi foam is only 3lb/cu.ft (this is about twice as strong as standard polyurethane surfboard foam of the same weight). Those who have tried the 40 and 60psi foam claim this will allow a builder to reduce the cloth approximately by half and have a stronger, and/or lighter stringerless board. This is unlikely to save money - the extra cost of the foam is more than the savings in cloth. and, you will not be able to bend 40 or 60 psi foam. Please use the 2lb. type for your first block foam board. Please resist the temptation to use sheets of foam from Lowes or Home Depot. Many builders have tried it and many of them have emailed me with the following problems: denting, delamination, water absorption, and shaping difficulties at the numerous glue joints. Some suppliers of partially preshaped EPS blanks are now offering a choice of foam densities. You will have a more durable board (other things being equal) if you choose the higher density foam (2.5 lb./cu.ft. & 3 lb./cu.ft.). There is a reason Clark Foam sold 3 lb. and 3 lb.+ blanks. It is often more cost effective to use a higher density core and a lighter shell - the foam is usually less expensive than the cloth and resin. I added this paragraph due to many emails. You can ruin your blank in a split second with a hotwire cutter (I have). For a the building of personal boards I advise extra caution when using a hotwire cutter, or a planner. An inexpensive drill with a sanding disk is very efficient at removing foam. If you are committed to shaping numerous polystyrene blanks (working for profit) you might consider making a hot wire cutter to cut the excess foam down to the stringer line etc.(please do not make a hotwire cutter for one board). Also you could buy a planner modified for foam (Hitachi from www.foamez.com - these are outrageously expensive now). If you buy a non modified planner (sometimes ten times cheaper), look for one with a 3/16" cut (check Harbor Freight). Note that you can make the planner cut deeper if you sand/grind the aluminum front plate down (this is what they do when you buy a modified one). Remember: A planner is not essestial for shaping a surfboard. A drill sander and hand blocks will suffice. If you use a hot wire, please practice on scrap pieces, please wear a respirator, and please set it up so power can be disconnected quickly. After weeks of design and testing the author made a video on youtube featuring three simple, practical hot wire cutters. The you tube link is below: https://www.youtube.com/watch?v=juYzB7fF-DQ Please do not try to make your own foam blank from liquid chemicals. I have tried it numerous times and found the results non useable, for practical purposes, in a garage setting. If anyone figures out how to do it economically, and reliably, please email steve@surfersteve.com Allow me to simplify your decision by suggesting the following Most first timers get through the shaping ok, if they follow the directions. Many people claim glassing is harder. |