How to Build Your First Surfboard
by Stephen Pirsch

HOME
Introduction
Design
Stands and Blocks
Shaping
Polystyrene
Epoxy
Glassing
Hot coat
Fins
Sanding
Art Work
Gloss Coat
Leash Plug
Books
Material Lists
Resin Amounts
Equipment List
Misconceptions
Tips
Sm Wave Design
Research
Videos
Helpful Links


This is your site. It is not biased by any direct advertising and no money is accepted for any links shown. It is made for you and supported by you.

PLEASE DONATE!


HALL OF FAME
~~~~~~~~~~~~~~~

Thanks to the users below for keeping this site alive and unbiased with their donations.

Mark Sadler
Kevin Kuzma
Mark Griffith
Kirra Oredson
Logan Leitch
Joyce Shingler
Alex Bayer
Greg Bayer
Ian Pirsch
David Shell
Fab Ordonez
Tom Walczewski
Anthony Rynicke
Peter Young
Lori Hartline
Terence Harper
Robert Campbell
Thomas Gustafson
Michael Filanowski
John Gaudette
Philip Meagher
Russell Simms
Randall Kirkpatrick
Calvin Arnold
Preston Renbarger
Mark Schreiter
Mike Sheldrake
Ritchie Ginther
George Young
Michael Simbulan
Bradley Saviello
Poolguy Network
Elan Yaari
Mathieu Corbeil
Sergey Terentev
Anthony Azcona
Hamish Eassie
David Merga
Spencer Ward
.


DESIGN

Deciding on shape is probably the most important part of making a surfboard.  Thrusters and longboards have their place, but many surfers are riding designs which do not maximize the fun possible on the type of waves being ridden.  Often it seems the image a surfer thinks he will portray is affecting his design decision. 

The best way to simplify the decision is to ride as many different surfboards as possible.  This is important.  It is unlikely you will ever know what is best suited for you if you do not experiment.  One hour surfing a different board is better than ten hours reading about design, or listening to opinions.  Most surfers will let you try their board for a few minutes.  Try your friends' boards or rentals.  Find one you like, then copy it or modify it.   

I love seeing all types of surfboards, but I feel that the biggest design drawback is simply building too small.  This appears to be a common problem with all types of surfboards.  My friends and I are happier surfers now that we are designing for the average conditions of ourselves and our home break.  Many people quit trying to surf  simply because their board is too hard to paddle and catch waves.  

Generally accepted truths about surfboard design: 

  1. A relatively wide, thick, long, flat shape is generally better for small or slow waves. 
  2. A relatively narrow, thin, short shape with more than average bottom curvature is generally better for fast, hollow, or large waves (not double overhead plus).
  3. A relatively long fin(s) or one placed towards the tail end will make turns  having a larger radius and having a feeling of projection (energy is transferred strongly from one direction to another).
  4. A relatively short fin(s) or one placed towards the nose will make shorter radius turns and will have a feeling of looseness (board will turn easily but slide somewhat). 
  5. Sharp down turned rails are better suited for hard, leaning, gouging turns in smooth water conditions (sharp and down turned only in the rear quarter transitioning to rounder rails in the front). 
  6. Round rails will make smoother, slower, speed conserving turns. Round rails are more forgiving, and are much better suited to choppy conditions.  
  7. A shape with more curvature in the outline (other things being equal) will tend to turn easier, and create more planing drag than a more parallel outline.
  8. Whatever preconceived notion a person has about  the type of board he wants to ride is more likely to determine what he rides than what is best suited for the conditions!   The site, essentialsurfing.com, and the Clark Foam catalog, have good, free, design information.


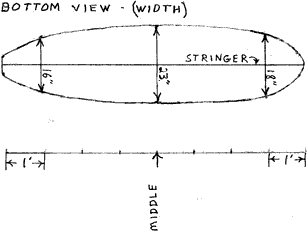
If new to surfing, ride mostly small, or slow waves, or just enjoy early wave entry gliding, use the following  guidelines: 1/2" thickness for each 25 lb. of body wt. and 2' longer than height.  To be more exact use:  .50 cubic feet of foam per 25 lb. of body weight (the US Blanks, and Clark Foam catalog has the cubic foot numbers for each blank for free online at www.foamez.com ). For example;  a 150lb. surfer divided by 25 equals 6.  6 times .50  = 3 cubic feet of foam.  Add at least 5% (1/4") for shaping losses which brings the example to  3.15 cubic feet.  Simply look at the displacement number (cubic feet of foam) in the catalog for the blank with a close number.  If you pick a blank within 10% of your number you will have a good wave catcher.    Remember to add 10 lbs to your weight if you wear a wetsuit often when surfing.  These guidelines are maximums.  More is not likely better in this case.  A board designed using the math above gives a huge advantage in crowded conditions, by allowing early wave entry.

There are many alternatives to the standard thruster and longboard shapes.  Instead of using a longer blank you could use one that is shorter, wider and, thicker.  One & one half inch  in width or, one quarter inch in thickness is approximately equal to six inches in length (width and/or thickness through the entire blank, not just the center).  A board 6.5' x 22" x 2.25" will catch waves about the same as a board 7' x 20.5" x 2.25".  A board  8.5' x  23 " x  3.25"  will catch waves about the same  as a board  9 x 23" x 3" . A shorter board will turn easier and go from turning to planning faster than a longer board.

If you cannot decide what rocker to use, consider five inches at the nose tip, and two inches at the tail end.  An easy way to form a useful rocker on any surfboard is: Divide by 2.5.  Divide the total nose end or tail end rocker by 2.5.  This will give the rocker at one foot from the nose or tail ends.  Dividing this new number by 2.5 will give the rocker two foot from
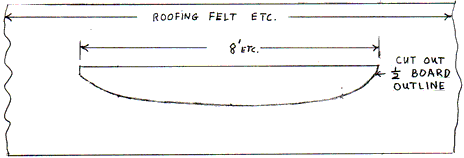
 the nose and tail ends.  Example:
5" divided by 2.5 = 2" at one foot point.
2 " divided by 2.5 = .8" at two foot point.
The curvature can be easily free handed between these points.  Any facets on the template or foam can be easily removed with sanding blocks. The 2.5 curvature will create a larger planing area in the middle of the board, compared with production boards.  For a rocker that is similar to production boards divide the nose measurements by 2.25 and the tail measurements by 1.75.

A blank (with all its measurements) can be choosen from the Clark Foam catalog and copied with polystyrene block foam - this is the hard, cheap way.  See POLYSTYRENE.  Note: Although Clark Foam is out of buisness, the old Clark Foam catalog is an excellent design resource. Also; see the US Blanks catalog - both available at Foamez.

The easiest way to shape a surfboard is to pick the exact blank needed.  Anyone who orders a roughly shaped polyurethane blank, and has to cut the entire rail with a saw, or plane in different rocker, is probably working much harder than is needed.

Unless you are sure the blank will not have to be modified (blank is exactly the shape you want), make a template (as outlined below) on 30 lb. roofing felt, or trace the board outline directly on the blank - the left over roofing felt will be used later to protect the floor when glassing.  Making a template will allow mistakes on a very cheap surface, instead of an expensive blank.  Also, a template will make it very easy to exactly duplicate, or slightly modify an earlier board.  Resist drawing numerous lines, hoping to visualize what looks right.

Make an outline template by doing the following:

  1. Place the original board top down on 30 lb. roofing felt,  and trace out 1/2 the outline longwise (If traced 100%, it is not likely to be symmetrical).  Use the machine edge of the roofing felt as the center line.  Keep the pencil (white colored pencil, or silver ink marker is best for roofing felt) at ninety degrees to the rail edge.  This can be insured by taping the pencil to a torpedo level.
  2. Remove the fin/s, and line up the outline template with the stringer/centerline of the model board.  Make sure it is perfectly aligned with the nose and tail.
  3. Feel around for the box hole etc., under the roofing felt, and mark the center outside edge of each end of the hole.  With a sharp pencil, poke a hole in the felt and connect the holes with a straight line (so the hole can be found).  This will save you the trouble of measuring when you install the fins - mark the fin location/s by putting the template on top of the board and mark the locations through the holes.

A rocker template can be made by doing the following:

  1. Put the board rail up (at 90 degrees to the floor) with rolled towels about 2' from each end, under the rail (to keep the board from moving).
  2. Brace the board with a box etc., on each side (to keep it from tipping).
  3. Tape a marker to a mixing paddle etc., and trace the rail outline by sliding the mixing paddle along the flat surface of the board (at 90 degrees to the floor) as the marker contacts the roofing felt (tracing the entire rocker from nose to tail, top and bottom).  The paddle is needed to bridge the extra distance from the floor at the nose and tail.  Where the towels and boxes block a continuous line, simply connect the lines after removing the towels, boxes, and board.


If the above method is not practical, get measurements (or use your own) at 3, 6, 9, 12, 18, and 24" for the last two feet of nose and tail, and every one foot for the rest of the board length. Do the following:

  1. Measure from the stringer to the board edge using a framing square etc. and a torpedo level at ninety degrees on the rail. 
  2. Mark these points on roofing felt, and draw straight lines between the points. 
  3. Create the curvature by cutting slightly outside the lines between the points. 
  4. Finish creating the curvature by sanding the edge of the roofing felt with the #50 short block (see STANDS AND BLOCKS). 
  5. Roll it up, and put it in a box (see Figure 4). 

Note:  If you know the blank will not need to be modified (recommended), these steps can be skipped.

 Although there are many good reasons for making the measurements below, I urge tracing the outline and rocker of an existing board on 30 lb. roofing felt (as mentioned above), or directly on to the foam blank.  If measurements are possible , a piece of roofing felt can simply be taken where the measurements would have been made, and traced instead.   Tracing is faster, easier, and less prone to errors.

If you must measure, see Figure 1, 1a, 2, 3, and the directions which follow.   

 Figure 1

Figure 1a


Figure 2

Figure 3

If you insist on measuring try these steps:

  1. To get the needed measurements and transfer them to roofing felt or, new foam blank (or better yet simply pick the blank with these measurements) you will need a tape measure and 1-10' piece of electrical metallic tubing.  You can use anything perfectly straight and as long as your board.  Electrical metallic tubing is available at Lowe's etc., for $1-$2.  Make sure it is straight (sight down its length while turning).
  2. To get and transfer the measurements in Figure 2, you must mark the center points of the original surfboard bottom and the electrical metallic tubing.  
  3. Roughly level the surfboard by putting a level over the center mark and parallel to the stringer (wood center piece of surfboard).  If the surfboard is on the ground you will probably have to put something under the tail, if on stands slide it nose forward.  
  4. Balance the center mark of the electrical metallic tubing over the center mark of the surfboard and parallel to the stringer.
  5. Center a magnetic torpedo level over the center mark of the electrical metallic tubing (magnet will stick).  You will probably  have to shift the level of the surfboard to get the electrical metallic tubing to level exactly (bubble in center) over the center marks (see Figure 3).
  6. Once level,  get the measurements shown in Figure 2, (more measurements are better - 3. 6, 9, 12, 24" from the nose and tail ends, then every 1').  You may repeat this process when you begin to shape your foam blank.

    Figure 4


  7. Take the following fin measurements:  (1)  distance of fin box or fin(s) from tail end,  (2)  angle of fin(s), (twin or tri fins only - you could cut roofing felt etc., to match the angle or use an angle finder tool).  (3)  distance of fin front edge and rear edge from stringer (twin or tri fins only, see FINS).

     
  8. Assuming no calipers, take approximate thickness measurements at 3, 6, 9, 12, & 24" on each end, and each foot thereafter.  Do this by putting the board rail up, straddle it, and look directly down.  Line your eye with the end of a measuring tape, and the bottom (flat vertical side) of the board.  Move your head to line your eye with the top and write down the measurement.  Repeat as needed. With practice, many people are accurate to within 1/8".
  9. It is much faster, easier, and less prone to errors to trace.  Measuring should only be needed if building from catalog measurements, or creating a shape from modifications of other shapes.  Ordering a polyurethane surfboard blank that is exactly the shape wanted can eliminate tracing and measuring (some measurements may be needed to figure out which blank to choose).

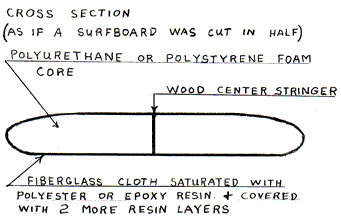
If choosing a roughly preshaped, polyurethane blank,  pick the blank and rocker that is the closest to your desired measurements.  The less foam you shape off, the stronger your board will be, the less work you will have to do, and  less errors  you will make.  Note:  There are now two versions of polyurethane;  one which is uniform throughout (MDI), and another which has a crust (dense 1/8" outer layer) - (TDI)

Polystyrene block foam will allow a design that would be impossible with polyurethane foam.  In contrast to TDI polyurethane, polystyrene foam is the same density throughout, so buying oversize polystyrene block foam is ok, and advisable.

Combine the smallest stringer possible, with more cloth in the laminate.  Epoxy glue joints, and stringer less blanks work well also, if the amount of cloth in the laminate is increased.  Break tests done on surfboards indicate a surfboard with a light stringer (1/12" is light) and heavy laminate is stronger than a surfboard of the same weight with a heavy stringer and light laminate.  Multiple light stringers or epoxy glue joints are stronger than an equivalent large stringer.

Check  www.foamez.com , www.fiberglasssupply.com, and www.surfsource.net for availability of polyurethane and polystyrene blanks.  If available, you can save money by having a blank shipped, and held at the central shipping warehouse (to be picked up by you) in your city, rather than delivered to your home.  Polystyrene block foam is available in all large cities.

Please do not short cut what is probably the most important part of board building;  your design.  It is amazing the hours of sanding and rubbing builders are willing to endure for a glossy finish, while stubbornly refusing to think for one minute about design.  Ask yourself, "what are the average surfing conditions of my home break, and what design will best allow me to take advantage of those conditions?"  Ride a lot of boards before you design!

[Next]

 
© 2003 by Stephen Pirsch, All Rights Reserved.

Site Meter