|
HOME
Introduction
Design
Stands and Blocks
Shaping
Polystyrene
Epoxy
Glassing
Hot coat
Fins
Sanding
Art Work
Gloss Coat
Leash Plug
Books
Material Lists
Resin Amounts
Equipment List
Misconceptions
Tips
Sm Wave Design
Research
Videos
Helpful Links
This is your site. It is not biased
by any direct advertising and no money is accepted for any links shown.
It is made for you and supported by you.
PLEASE DONATE!
HALL OF FAME
~~~~~~~~~~~~~~~
Thanks to the users below
for keeping this site alive and unbiased with their donations.
Mark Sadler
Kevin Kuzma
Mark Griffith
Kirra Oredson
Logan Leitch
Joyce Shingler
Alex Bayer
Greg Bayer
Ian Pirsch
David Shell
Fab Ordonez
Tom Walczewski
Anthony Rynicke
Peter Young
Lori Hartline
Terence Harper
Robert Campbell
Thomas Gustafson
Michael Filanowski
John Gaudette
Philip Meagher
Russell Simms
Randall Kirkpatrick
Calvin Arnold
Preston Renbarger
Mark Schreiter
Mike Sheldrake
Ritchie Ginther
George Young
Michael Simbulan
Bradley Saviello
Poolguy Network
Elan Yaari
Mathieu Corbeil
Sergey Terentev
Anthony Azcona
Hamish Eassie
David Merga
Spencer Ward
.
|
FINS
Removable fin systems are probably the best choice - fins and fin
positions can be changed in relation to wave size and speed.
This will drastically change the way a surfboard maneuvers.
Also fin removal makes for better travel. It is nearly impossible
to take a board with un-removable fins on any plane or bus.
Note that many builders say fin installation is especially difficult.
Practice first.
If you cannot decide on which fin setup to use, do the following:
- For a longboard use the 8" standard molded fin with 10.5"
box from www.surfsource.net.
- For a thruster or twin use the future fins molded tri or twin
fins and boxes from www.fiberglasssupply.com.
(Future Fin systems are usually installed before laminating -
after shaping, using a different technique - See below).
- For an alternative see - SMALL WAVE DESIGN .
The molded fins are about half the weight and less than half the
cost of fiberglass fins and work great. One big advantage
of the molded fins are that they tend to break before the rear of
the board becomes damaged - use breakaway fin plates (if possible).
It's generally not economical to make your own fins. Note
that a large molded fin (about eight dollars) can easily be cut
and shaped to almost any shape.
If not doing a gloss coat, do the fins before the hot coat.
Please check and recheck your measurements, and templates.
If you practice, it will be easier and less stressful.
The following instructions will be in five parts; PART 1 -
SINGLE FINS, PART 2 - TRI AND TWIN FINS, PART 3 - FCS, PART
4 - GLASS ON FINS, and PART 5 - MAKE YOUR OWN FINS. The stringer
and no stringer methods are meant to be used with the five part
instructions which follow them. Please practice on scrap foam
first - especially wood removal.
STRINGER METHOD (wood or glue joint removal at fin box hole)
This method requires using the drill as a router. Do the
following:
- Obtain a router bit deep enough for your box depth (take box
to store). Put router bit in drill.
- If drill has two handles and a depth rod, hold the box bottom
even with the router bit end and adjust the depth rod to the top
of the box (rod will slide on laminate or hot coat). If
thedrill has no depth rod, cut a scrap piece of foam about 1"
x 1" x 4". Tape the foam to the side of the drill
at the depth needed (1" end of the foam will slide on the
hot coat). Try to router the hole so the box top will be
flush with the laminate or hot coat.
- Slowly cut the stringer material first. Hold the drill
tightly, being careful to control the hazard of the router bit
grabbing and bouncing off the wood, causing a cut outside the
lines. Stay about 1/16" inside the fin box outline.
Finish hand sanding to a snug fit. Note: If you have
no power tools the stringer material can be removed with a chisel
or an old sharpened screwdriver, after first cutting the outline
with a hack saw blade (as mentioned below).
NO STRINGER METHOD (foam removal only)
Note that a nice fin box hole can be made with no power tools.
Using a router or drill to make a box hole, is risky for first timers.
All that is needed is a hack saw blade and a piece of 20 or 50 grit
sand paper. Try the following steps:
- Cut one end of the hack saw blade at a 45 degree angle, and
the other end at a 90 degree angle with tin snips etc. If the
hack saw blade can not be cut, simply break the ends with a pair
of pliers (after breaking the blade ends, use the pliers to straighten
the slight bend which the break will cause).
- Wrap the hack saw blade with about 10 wraps of duct tape at
the box depth (prevents blade from over cutting depth).
- Using the sharp (45 degree) end of the hack saw blade, force
the sharp tip into, and through the laminated cloth inside the
box outline. Cut about 1/16" inside the box outline.(any
unevenness and smallness will be corrected by sanding).
- Remove the cut cloth.
- Cut lines across the foam within the box area, 1/8" apart
to box depth lengthwise and, 1/2" apart crosswise).
- Remove the cut foam with your fingertips, and scrape the bottom
with square end of the hack saw blade. The walls and bottom
can be sanded with #20 or #50 folded over (about 4 folds) to a
small, stiff rectangle (try to match sandpaper width to box width).
Only the top edge of the box hole will be visible (try to get
a snug fit - any unevenness in the foam can be filled in with
resin when installing the box).
PART 1 - SINGLE FINS (practice on scrap foam first
using the STRINGER METHOD or NO STRINGER METHOD above). Install
after laminating.
Do the following:
- Mark the fin box location using the measurements from the model
board (probably 4 - 5" from the tail end for a 10.5"
box).
- Router the hole using the STRINGER MEHOD or NO STRINGER METHOD
- Rough the box with #50.
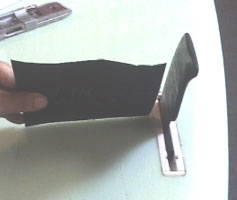
- With the fin still in the box, tape very carefully around the
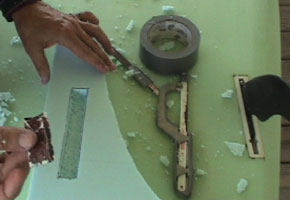
fin so resin cannot get into the fin box (Figure 19). Use
chemical resistant tape or duct tape. Note that some fin
boxes come with the top sealed. Sand the top seal off and
installing the box with the fin, to insure straightness. Although
there are photos below of taping around the box hole - this is
not needed. Simply wipe up the excess resin with paper towels.
This will eliminate the possible problem of resin hardening over
the tape, making it very difficult to remove. This also
eliminates the problem of the tape being pulled too soon, causing
fin misalignment. Be double sure resin can not get into
the fin box (always tape around the fin).
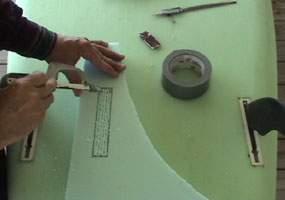
- Cut 2 -4oz. strips of fiberglass cloth at least 1" wider
and longer than your box hole on all four sides. Test the
fit by centering the dry strips over the hole and smashing the
box all the way down. Adjust as necessary for tight fit.
The box should be flush or barely sticking up. Remove the
box and the strips.
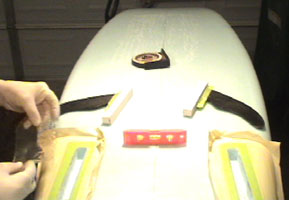
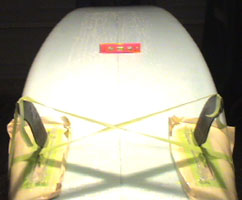
- Make sure the board is level on the racks. Use the torpedo
level, angle finder or, anything that is ninety degrees
Note: If the board is exactly centered below a light it
will be much easier to see if the angles are accurate. You
might need to put a 6" x 6" piece of cardboard
near the side of the fin box. This will create a level surface
to put your ninety degree tool on. which will span the wet cloth.
- Make sure the following is available before you mix the resin:
wax paper, 1" masking tape, razor blade, gloves, angle finder
etc.
- Epoxy : Mix about 2oz resin and 1 oz hardener. Polyester:
Mix about 3oz resin with 1cc cat. and 2cc wax (measure with syringe)
- Put the 2 - 4oz. strips on wax paper, and pour about half the
resin on them. Squeegee the resin evenly into the cloth.
- Center the wet cloth over the hole and push the box all the
way down. Pour the resin mix around the box edges until
it runs out.
Note: the tape shown on the board above often causes more
problems than it is worth. Skip the taping shown and simply
wipe up any excess with a paper towel. Always tape around
the fin in the box, however. Make double sure resin does
not get into the box. Use only duct tape or chemical resistant
tape.
- Set the angle of the fin/s using a fin angle template (see
DESIGN) or angle finder tool.
- Tape the fin by running 1" masking tape from the top of
the fin to both edges of the board. Trust your eyes.
If the light is even, and it looks crooked, it probably is crooked,
even if it was perfect before it was taped.
- When the resin is rubbery, pull the tape where the fin meets
the box, and remove the fin. Do not worry about the cloth
sticking up - this is easily sanded down later.
- If the box is sticking up put 3 layers of duct tape around
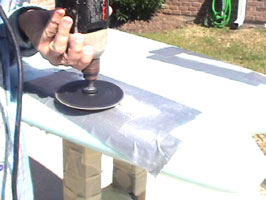
it and sand it with #50 disk till the tape starts disintegrating.
Stop. Remove the tape. This tape will keep the cloth
from being sanded into around the fin base. The disintegrated
tape can be removed with alcohol and a razor blade. Note:
If you leave the box sticking up very slightly it is much easier
and safer.
Single fins can be installed using the same method as tri and twin
fins (below). This is slightly easier and it is the way many
pro shops do it now. However; by using the method in this section
it is less likely the cloth will be ripped around the box if you
hit a rock etc., (this is rare if you use breakaway fin plates).
PART 2 - TRI AND TWIN FINS (usually installed directly after shaping,
using the STRINGER METHOD or NO STRINGER METHOD- practice on scrap
foam first)
Future Fins systems recommend routering the hole before you laminate
(after shaping). Future Fins also recommends buying their
very expensive tools. To the contrary; Future Fins boxes can
be installed using much the same technique as above. Practice
on scrap foam first.
Directly after shaping (before laminating).
F ollow the steps:
1. Mark out the box flange and the box (square part that fin fits
into - ignore the ribs). See GLASS ON FINS below for more
location information. Cut the box hole only (not the flange)
with the hacksaw or drill/router using the STRINGER METHOD or NO
STRINGER METHOD above. It is critical that this be a tight
fit.
2. With a lone hack saw blade (break or cut off a 1" piece
of saw blade) scrape away the foam in the area the flange will sit
on, until the top of the flange will be flush with the surrounding
foam.
3. Push the box slowly into the hole testing for flush fit.
4. Reinsert the box in the hole and make sure the flange is flat
(flush) on the surface of the board (if the box flange is flush,
the side fins will be about four degrees, on Future Fins).
5. Pull the box out again, sand it with #50 and, wipe it with alcohol.
Tape plastic box hole with duct tape or chemical resistant tape.
6. Cut two 4 oz. layers of cloth in a football shape to cover each
box (about 1" beyond box edges).
7. Mix about 3 oz. resin for each fin. Use epoxy if using a polystyrene
blank.
8. Using your gloved fingertip, apply a thick layer of resin to
the box (including the underside of the flange), box hole and, foam
flange area.
9. Insert the box into the hole.
10. Put the football shaped layers over the box and saturate the
cloth with resin. Wipe up any excess resin before it gels.
Note that this fin system gets much of its strength from the laminate
coat which will later cover most of it
PART 3 - FCS
FCS is the easiest to install and the easiest to damage.
FCS can be installed using the same method in the LEASH PLUG chapter
(see conventional leash plug).
PART 4 - GLASS ON FINS
If glassing-on (un removable fins) it saves a step to do it before
the hot coat.
Please follow the steps:
- Mark the fin(s) location according to your model board.
Please note that the measurements below will not give optimal
results on all boards. If you do not have a model board
you are copying, keep the rear bottom fin edge (on the side fins)
about 1" from the rail edge. If you draw a straight
line along the side of a side fin, it should end up about 2"
( varies) from the mid tip of the nose (on that fin side).
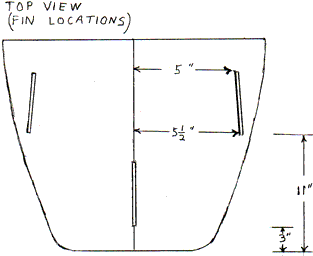
Figure 20 Note: The 51/2" below should be about
51/4"
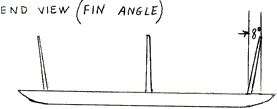
Make sure the board is level on the racks and light is centered
overhead. Use a fin angle template (see DESIGN) or angle
finder if the fin lean angle is needed. This angle is four
to eight degrees (four is common).
- Hold the fins in place with 1" masking tape run from the
fin(s) tip to both board edges.
- Mix some resin/catalyst and drip it around the fin(s) base
(just to hold them in place). 90 second or 5 minute epoxy
works well for this.
Figure 21 Note: The fin lean angle below can be from 4degrees
to 8degrees.
- Cut fiberglass rope about 1/2" longer than fin base (both
sides).
- Cut 2 layers of 4oz. cloth to fit about 3" up fin height
and about 3" across the board for each side of each
fin.
- Mix about 6oz. total resin and hardener for a single longboard
fin - about 3oz. for each thruster fin.
- Saturate the rope on wax paper (keep it straight).
- Lay the rope at the fin base (one on each side).
- Saturate the cloth and put 2 layers on each side of the fin.
Smooth out the rope curve with a finger.
Note: The fin will break off cleanly, rather than possibly
tearing a hole around the fin base, if the following is done:
Reduce the amount of rope to about 1/4 the original amount or just
replace it with 4 - 4 oz. strips 1/2" - 1" wide
on each side (narrower cloth to the center). Please realize
that the fins will break off easier this way but more cleanly.
Cut excess when gelled. Remove tape. Prepare to hot coat.
PART 5 - MAKING YOUR OWN FIN (do this only if shipping is a problem)
Probably the easiest and cheapest way to make a fin is with wood.
Cedar fence wood works well. A 6’x 5&1/2”
x 1/2"” piece costs about $2.50 in 2008. Cedar
is light, rot resistant, beautiful, and shapes easily.
1. Make a fin template from cardboard etc.
2. Trace the template on cedar fence wood.
3. Cut the wood 1/4" outside the template outline, with a hand
saw (consider cutting and making two wood cores - one for practice).
Use a hack saw etc.
4. Use a drill with #16 sanding disk to shape the wood core.
Put drill in vise or put weight on top of the drill to stabilize
it (brick etc.). Pay close attention to the foil. The
front edge should be rounded, with the 3/8" thickest point
of the fin, about 1/3 of the distance from the front edge.
It should gradually become thinner from this point, to become almost
sharp at the rear edge (similar to an airplane wing). If you
do not shape it this way it will likely vibrate and hum loudly.
See http://www.grc.nasa.gov/WWW/K-12/airplane/foil2.html. If you
are making twin or tri fins, foiling the inside face of the fin
is not needed (it can be flat), although it will work if you do
foil it. Always symmetrically foil both sides of center fins.
Finish hand sanding with #50.
5. Mix 1 oz. total resin and hardener and coat wood core on all
sides. Leave about 1/4 of resin in the container, and recoat
the fin before the resin hardens – the resin will sink into
the wood on the first coat.
6. Place the fin bottom down on a sheet of wax paper (brace it with
a brick etc.,).
7. Repeat # 5.
8. When hard, do not sand with power sander - you may sand into
the wood. Hand sand. Start with #50. Sand bottom edge
with sanding block.
9. Fine sand and buff as in GLASSING if desired.
Using cedar for a core will make a beautiful, light fin. People
will stop to look. The fin will float on its own. I
am assuming you will be glassing on your fin if you make your own.
If you can get a box shipped, you can get a fin shipped. It
is not worth making your own fins unless shipping is a problem.
Note: An entire surfboard could be made from cored (drilled
to remove about 50% of wood) and glued cedar fence wood. This
would be similar in price to a foam board assuming cloth would not
be used on the cedar. The cored cedar board would be heavier
and more work, but very beautiful. Numerous surfers have built
cored boards with other woods, but I know of no one who has used
cedar.
Please install a fin box if possible, and please practice first.
[Next]
|
|
|