This is your site. It is not biased
by any direct advertising and no money is accepted for any links shown.
It is made for you and supported by you.
PLEASE DONATE!
HALL OF FAME
~~~~~~~~~~~~~~~
Thanks to the users below
for keeping this site alive and unbiased with their donations.
Mark Sadler
Kevin Kuzma
Mark Griffith
Kirra Oredson
Logan Leitch
Joyce Shingler
Alex Bayer
Greg Bayer
Ian Pirsch
David Shell
Fab Ordonez
Tom Walczewski
Anthony Rynicke
Peter Young
Lori Hartline
Terence Harper
Robert Campbell
Thomas Gustafson
Michael Filanowski
John Gaudette
Philip Meagher
Russell Simms
Randall Kirkpatrick
Calvin Arnold
Preston Renbarger
Mark Schreiter
Mike Sheldrake
Ritchie Ginther
George Young
Michael Simbulan
Bradley Saviello
Poolguy Network
Elan Yaari
Mathieu Corbeil
Sergey Terentev
Anthony Azcona
Hamish Eassie
David Merga
Spencer Ward
.
SHAPING
If you are using polystyrene foam read the next chapter first.
The following instructions will work for any hard foam, but are
now best suited for polystyrene block foam. If you have found
a polyurethane, or polystyrene blank which is close to what you
need (without shaping modifications) you will be able to skip a
lot of the steps here. Ideally (with polyurethane foam) you
can plane off the crust (if it has a crust), lightly sand, do a
few details and, you are done shaping. Shaping a surfboard
from a square block is much more labor intensive. If you are
not sure then do not skip anything.
Note: I get a lot of emails questioning the usefulness of
videos, and the differences in the methods advocated in this book
compared to pro shop methods. The videos available show how
pros build boards using power planners, power sanders, routers,
air brushes etc., It is all entertaining, but I feel it is
not very useful for a first time builder. Not only are you
unlikely to have access to these tools, but if you did, you probably
should not use them because they are more likely to cause you to
ruin your first board. Please know although much effort has
been made to save you from problems, you will have problems that
cannot be foreseen. I feel, however, you will have much fewer
problems if you use mostly hand tools, and instructions made for,
and influenced by, first time builders. I believe you will
be much happier making your first board if you keep it simple, and
realize it will not be perfect.
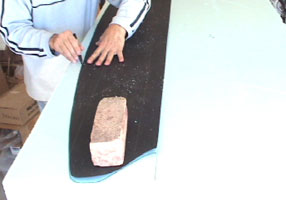
Practice on scrap foam first. Put special emphasis on practicing
shaping the rails. You can shape a 1/10 scale replica of your
board. A full thickness piece as shown below is good for rail
practice..
Once again, if you are shaping block foam, please follow the directions
in POLYSTYRENE - shaping the rocker before cutting the outline.
Do the following:
Put your blank bottom up on your rack.
Draw a straight line, (across the width) about 1/2" from
one end of the blank, flip the blank, and mark another line directly
beneath it (use a framing square etc).
If you do not have a stringer, ( I recommend no stringer if
you are using block foam) draw a center line.
Line up the 1/2 template, with the center line, and with the
line across the end of the blank. Also, the board you are
going to copy can be placed directly on the blank. Trace
it on the blank with a "Sharpie" pen.
Flip the template over and trace it on the other half.
Flip the blank, and repeat. Double check. The two
templates must line up, or you will have major problems later.
Take a hand saw (almost any saw will do) and slowly cut about
1/2" outside the lines. If you are very careful you
can try cutting at 1/4". Try to make sure the saw is
cutting at a 90 degree angle to the blank. If not the extra
1/2" should make up for the crookedness. Check by looking
at the template lines underneath.
Turn your blank rail up on the racks. Take your #12 or
#16 block and gradually, keeping a 90 degree angle, sand the foam
down closer and closer to the lines. Stop when you are about
1/8" from the lines all around (top and bottom).
Note that it is important to get in the habit of using long strokes
running end to end when doing most of your blank shaping.
After you get some of the initial unevenness of your saw cuts
removed, practice using longer and longer strokes. Count
10 stokes on one side then 10 on the other. If you start
off doing things evenly, and continue doing things evenly, you
will have much fewer problems, and much less work overall.
Please resist "scrubbing" from one area to the next.
If you are using TDI polyurethane foam you will notice it has
a 1/8" hard outer crust. Be careful, the crust takes
a lot of work to remove, but after barely going through it, it
becomes softer and softer. A TDI polyurethane board will
be much stronger if you keep it close to the original molded shape.
Also, once through the crust you can gouge a dip without trying
to. The cheapest and easiest tool to use for crust removal
is a small (smallest) block plane. This tool may later be used
to plane the stringer. Set the small block plane blades
at a shallow depth so only the crust is being removed. Please
use continuous end to end strokes. You can also use your
#12, or #16 sanding block. Note: MDI polyurethane
foam and polystyrene foam is the same density throughout (no crust).
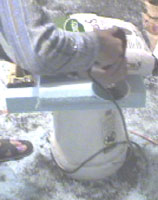
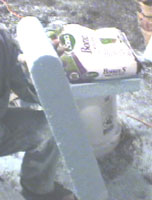
Place the blank bottom up on the rack. Level the blank
and level the center of the electrical metallic tubing over the
center of the blank (if you have block foam you will probably
be tracing the rocker template here - see POLYSTYRENE).
Take measurements as you did in DESIGN. Compare the design
numbers with the blank numbers.
If the rocker numbers are off more than 1/2" you may want
to start removing stringer material and foam with your small block
plane, or #12 or #16 sanding block. Also; the toothed edge of a hand saw can be dragged over the area - hold saw with both hands opposite the teeth on the smooth metal and pull lightly with teeth trailing across foam. Use a drill sander with #12 to #50
disk, or a power planer, as in POLYSTYRENE, if you have a lot of material to remove.
Please make sure you will have enough blank thickness when you
finish planning the rocker. If you simply must remove more
than 1/8" past the crust (polyurethane blank only), try to
do it on the bottom of the blank (the top needs to be stronger)
Plane the stringer (if you have one) to the proper rocker numbers,
then plane or sand the foam. Take care to not "scrub"
the foam in one area, causing a dip. Again, please adopt the habit
of counting your strokes in 10's. Stroke mostly end to end with
the same number of strokes on all parts of the blank - this promotes
symmetry. All the curvature must blend into the whole. I
recommend initially leaving at least an extra 1/8" of length,
width, and thickness in the blank. This will give you the security
of having a little extra foam to correct mistakes. The ideal
situation is to have ordered the correct dimensions when you bought
the blank. If not go slowly here. I recommend that you make
round rails and make the bottom and top flat side to side. This
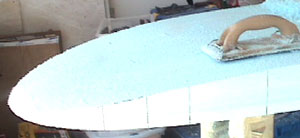
Next, I highly recommend marking what will be the furthest
protruding rail points about every 3" - 12" (3"
at the tight curves, and 12" at the straights) around the entire circumference of the blank. If the rails are round this will be at the center of the rail.
Connect the dots from the furthest protruding rail points using 2' x 1" roofing felt as a straight edge. This will create a continuous line parallel to and between the top and bottom rail lines (not shown in photo above). Leave this line until the end of your shaping. If it gets sanded, re-mark it. All this trouble will ensure symmetry, and save you from a major mistake. Most first timers find shaping the rails the most ddifficult part of shaping the blank. The tendency is to be too thin in one place. To fix one small thin area, often the entire blank has to be thinned to make it symmetrical. Go slow on the rails.
After the rocker is acceptable and the flats of the top and
bottom of the blank are rough sanded, start on rail curvature.
Again, the rails are the hardest part of the blank for most first
time shapers to get even. Do the rails very gradually, and symmetrically
(evenly) with light pressure. Turn the blank rail up and
sand the rail with the # 12 or #16 block. Sand 10 times on one
side then 10 on the other. Flip the board with the other rail
up and sand with the same counting, and same pressure. This simple
counting will make it much easier to keep your board symmetrical,
and will eliminate much work later on. As you start finishing
your curvature you will have to use proportionally lighter pressure
on the thinner areas.
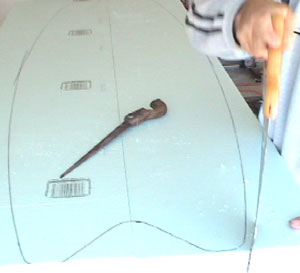
Stay away from, or only touch very lightly, the black areas
in Figure 11 (avoid on top side only). Although I mentioned
previously that you should use end to end strokes, do not stroke
longwise through the nose curvature. Stroke with your block parrallel
to the stringer until you reach the top nose curvature, then you
must stop. Finish the top nose curve with the block turned sideways
(perpendicular to stringer) or you will gouge a dip (a very common
and very hard to fix problem). Also, do not sand off your
mid rail line, (from the paragraph above) yet.
Figure 11
Small holes can be filled with interior/exterior lightweight
spackling.
Take your racks and blank outside and align the stringer with
the direction of the sun. As the sun changes position
change your racks to keep the light perfectly even. This will
make it very easy to see all the little dips and bumps you might
otherwise miss. Get back 10' - 20' and view the board rail up,
top up, and bottom up. Also turn the board vertical (careful the
wind does not blow it over) and view it, aligned with the sun.
Note: even shade is O.K. (overcast clouds and buildings).
Tree shade is the worst. Note: If you can afford 8'
fluorescent lights mounted at the same height as your board rails
on each side, this outdoor moving will probably not be needed.
Correct any large, obvious unevenness with your #12 or #16
block.
Take your #50 long block and start sanding the bottom. Sand
with block parallel to the stringer. Use a light, continuous motion
longwise from end to end. 10x's back and forth on one side then
10x's on the other. Keep sighting down the blank for uneven
spots. If uneven repeat. Don't try to remove dips and bumps by
scrubbing at them in one place. Blend them into the whole with
continuous long strokes. Don't try to correct uneven spots that
are less than 1/8".
Make sure the tops of the racks are level with the torpedo
level.
Slide the level across the bottom of the blank holding it parallel,
then perpendicular to the stringer. You can put it on top of something
that is very flat and about 2' long (long block-wood side down)
A long level is nice too. If you are making a board with a flat
bottom side to side (recommended), and the level bubble is outside
the center lines, sand until it is (not perfect just within the
lines). Look underneath the level/block as you slide it
along the length of the blank.
You may see high and low spots on the foam and /or stringer.
Mark the high spots with the "Sharpie". Plane
down the stringer to just below the foam level with your block
plane. Sand off the marked areas until within 1/8".
Run the long block parallel to and very lightly around the
bottom rails (just a few light passes to eliminate hard to see
dips).
Turn the blank top up and use the long block only on the rear
2/3 of the top -stay away from the nose curve. Do not push any
block longwise (parrallel with stringer) through the nose curve
- turn blocks perpendicular to stringer when sanding top nose
curve (See 26).
Plane the stringer as before.
Start sanding using the #50 small block as you did the long
one. Keep sighting aligned with the sun. If you see dips and bumps
you should even them out with the long block.
Now, #50 short block in hand, start blending the areas in Figure
11 into the whole. Please go lightly here. Keep the
block sideways as you push through the top nose curve. There
is a strong tendency to gouge a dip here.
Please round the nose tip. One California eye surgeon
I talked to does at least one eye surgery every week that is due
to thruster nose tips. Most of these cases result in one
eye blindness, usually caused by their own boards. I personally
have known two people blinded this way.
Next turn the board rail up. Your black rail lines should still
be there. Sanding longwise only, run your long block very lightly
above below and finally at the line. Try to do exactly the same
number of passes in the same areas in the same direction on each
side.
Take a sheet or belt of #50 sandpaper. Stretch it between both
hands and push it down firmly enough to make it curve around the
top rail curve. Now walk it down the entire length of rail.
Do this quickly and ease up on the nose and tail. Do both
sides until the rails are blended perfectly.
Step back and view the sun aligned board again - rail up, top
up, bottom up, and vertical. Fix any unevenness etc.
Pass the block plane at least one more time on the top and
bottom stringer until it is even or just below the foam. If you
leave the stringer sticking up the glass is likely to crack. You
may notice that the block plane doesn't work around the top nose
curve. Adjust your block plane to a slightly deeper depth
(only for this area).
Finish the fine details in perfectly even light.
Put it somewhere safe and leave it alone until you glass it, which
should be soon! Note that if you are making a tri or
twin fin board, you may want to install the boxes now - before you
laminate. See FINS.
Practicing with Materials video (1of 2)
Practicing with Materials suppliment video (2of 2)