|
HOME
Introduction
Design
Stands and Blocks
Shaping
Polystyrene
Epoxy
Glassing
Hot coat
Fins
Sanding
Art Work
Gloss Coat
Leash Plug
Books
Material Lists
Resin Amounts
Equipment List
Misconceptions
Tips
Sm Wave Design
Research
Videos
Helpful Links
This is your site. It is not biased
by any direct advertising and no money is accepted for any links shown.
It is made for you and supported by you.
PLEASE DONATE!
HALL OF FAME
~~~~~~~~~~~~~~~
Thanks to the users below
for keeping this site alive and unbiased with their donations.
Mark Sadler
Kevin Kuzma
Mark Griffith
Kirra Oredson
Logan Leitch
Joyce Shingler
Alex Bayer
Greg Bayer
Ian Pirsch
David Shell
Fab Ordonez
Tom Walczewski
Anthony Rynicke
Peter Young
Lori Hartline
Terence Harper
Robert Campbell
Thomas Gustafson
Michael Filanowski
John Gaudette
Philip Meagher
Russell Simms
Randall Kirkpatrick
Calvin Arnold
Preston Renbarger
Mark Schreiter
Mike Sheldrake
Ritchie Ginther
George Young
Michael Simbulan
Bradley Saviello
Poolguy Network
Elan Yaari
Mathieu Corbeil
Sergey Terentev
Anthony Azcona
Hamish Eassie
David Merga
Spencer Ward
.
|
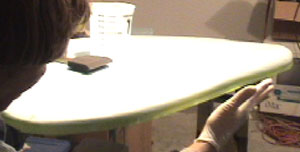
HOT COAT (fill coat)
The hot coat is mostly used to fill the gaps in the cloth weave.
It should not actually be hot. Many shops put extra catalyst
in their hot coat which makes it heat up. This is done to
save time.
If not doing a gloss coat, prepare the laminate coat almost as
if it is a hot coat. Sand the laminate lap lines, corners,
drips, and lumps very carefully before hotcoating, if not doing
a gloss coat - this same sanding can be done with less perfection
if a gloss coat is being applied. See GLASSING & SANDING.
Follow the steps:
- Turn the board bottom up.
- Wrap 1" masking tape (chemical resistant type) around the entire
circumference of the board at mid rail. (Figure 18).
Figure18
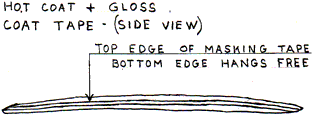
Press the top edge of the tape down firmly and let the bottom
edge hang free (lets resin drip off). Pull the tape up every
foot or so and put a crease in the middle of the tape to
make sure it does not flatten out on the board.
- Mix resin as before but use about 1/2 as much as when laminating.
If using polyester resin add styrene wax surface agent (wax)(see
MATERIAL LIST). The wax makes the resin set up non tacky
so it can be sanded. Wax should be added to polyester resin
at a ratio of 10cc wax to one pint resin (2%). Measuring
syringes make this easier. See RESIN AMOUNTS for help figuring
amounts. Mix this batch with a higher percentage of catalyst
than the laminate. Do not use styrene wax surface agent, or a
different hardener percentage with epoxy.
- Drag a finger around top tape edge again.
- Pour about half the resin on one side and half on the other
(two continuous ovals). On the bottom hotcoat keep poured
resin at least a foot away from the nose tip, so resin will not
run off.
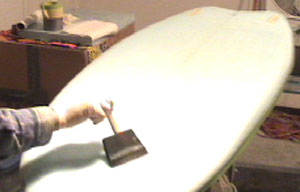
- Turn the cup upside down on a dry part of the board.
- Use cheap (throwaway) 4" natural bristle brushes or foam
brushes with epoxy. Use cheap natural bristle brushes only
with polyester. Foam brushes are roughly half the price
of the cheapest natural bristle brushes and work well with epoxy
resin. Start spreading the resin with the brush as you did
with the squeegee on the laminate coat (holding the brush at a
45 degree angle to the stringer).
- Take the cup off. Get the resin roughly even over the
flat sections trying not to let it run off the rails. Work
the resin slowly, roughly evenly over the rails, coating them
lightly to the tape. From now on cover the entire surface
of the board with each set of back and forth strokes.
- First stroke longwise one entire surface.
- Stroke 45 degrees one entire surface.
- Stroke 45 degrees the opposite direction.
- Stroke one entire surface crosswise.
- Brush two continuous circles brushing around the tape line
(do not smash the free hanging tape edge into the board).
- Check with a moveable light all along the tape line for dry
spots.
- Stroke the entire surface longwise very lightly and, slowly
one time, including the rails.
- Throw away the cheap brush (it will take more time to clean
it than it's worth and it won't be right anyway).
- Wipe out the cup with a paper towel.
- Pull the tape when the resin gels.
- When it hardens, flip it and repeat, except for the following:
When hotcoating the top remember to start all longwise strokes
from the nose end. Use slightly more brush pressure at the
bottom of the curve, letting up towards the tail. This will
even out the resin which tends to accumulate in the bottom of
the curve.
If applying the #16 sanded traction surface mentioned in GLASSING,
do the following. Do not put the styrene wax surface agent
in the top hot coat. Apply the top gloss coat (with styrene
wax surface agent - polyester only) directly over the hot coat without
sanding the top hot coat. Remember; there is no styrene wax
ever added to epoxy. The final #16 top coat sanded traction
surface will eliminate the need for a sanded hot coat and a smooth
gloss coat. When using this method, reduce the resin by two
to four ounces (depends on board size) on each of the two top coats.
One weight and money saving alternative is to not do a gloss coat.
If you carefully sand the lap lines and corners etc on the laminate
coat, the hot coat can look acceptably smooth. This will not
give you a board with the perfect look of a shop made board, but
many people find the weight and money savings attractive.
The difference in strength is barely noticeable. I recommend
not sanding the hot coat if foregoing the gloss coat. If the
cloth is slightly sanded into, the cloth will "wick" water
to the foam.
[Next] |
|
|